

1. Executive Summary: The Adult Learner’s Digital Paradox
Ever feel like your digital stylus is less like a pencil and more like a high-performance sports car you don’t quite know how to drive? You sit down at your iPad Pro or Wacom tablet, ready to relax, but the second your nib touches that slippery glass surface. In addition, your hand starts to wobble. Next, you hit a stroke, hate it, and instinctively perform the “two-finger tap” to undo. Ten minutes later, you’ve drawn the same eye twenty times, and you’re more stressed than when you started. The solution: employ the following 6 exercises to improve digital art proficiency.
This is the Digital Paradox: the very tools designed to make drawing easier often act as a barrier to actual proficiency. For the adult learner, this frustration is amplified by the Taste-Skill Gap—where your high aesthetic standards, fueled by years of “Discovery” on social media, far outpace your physical muscle memory.
Your Digital Art Roadmap: An Introduction To Exercises To Improve Digital Art Proficiency
This article is your roadmap to reclaiming control. We’re moving beyond software shortcuts and shallow tutorials to focus on Structural Logic—specifically how to use the Loomis Method as a “Logical Anchor” to ground your digital sketches. We’ll explore the science of neuroplasticity in fine motor skill development and introduce the 10:1 Quota, a digital wellness framework designed to silence your inner perfectionist.
Whether you’re struggling with pressure sensitivity settings or battling “Undo” addiction, you’re about to learn how to bridge the gap between traditional intuition and digital mastery. It’s time to stop fighting the glass and start building Structural Confidence.
2. The Mechanical Foundation: Calibrating the Human-Hardware Link
First of all, before you can master the Loomis Method or complex anatomy, you have to address the “slip.” Transitioning from the toothy texture of a sketchbook to a glass screen is like moving from a gravel path to an ice rink. If you don’t calibrate your hardware to match your biology, your brain will stay in “correction mode” instead of “creative mode.” Optimize your digital tools and workflow to retain a traditional drawing feel. This is one of the greatest benefits gained from exercises to improve digital art proficiency.
2.1 Taming the Glass Surface
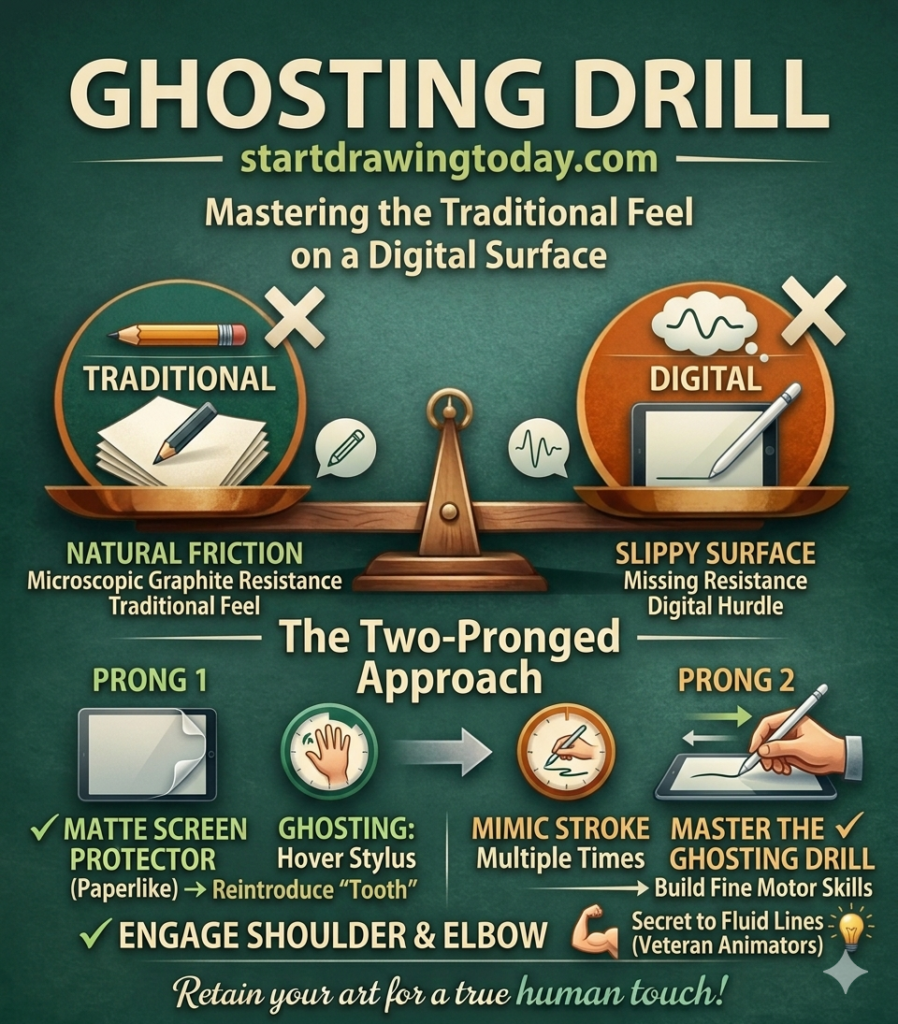
The primary hurdle in digital art proficiency is the lack of friction. When you use traditional drawing pencils, the graphite creates microscopic resistance against the paper fibers. On the contrary, when using an iPad or Wacom Cintiq, that resistance vanishes. This transition from tradition to digital tools often leads to the “shaky line” syndrome.
To combat this, we recommend a two-pronged approach. First, consider a matte screen protector (like Paperlike) to reintroduce “tooth.” Second, master the Ghosting Drill: hover your stylus slightly above the screen and mimic the stroke several times before making contact. This builds Fine Motor Skills by engaging your shoulder and elbow, rather than just your wrist. Historically, this is a tip any veteran animator will tell you is the secret to fluid lines.
2.2 The Physics of the Stylus: Pressure and Taper
In drawing apps like Procreate or Clip Studio Paint, the default “Pressure Curve” is often linear. This is rarely how a real pencil on paper works. To achieve a natural feel, you must manually adjust your software’s pressure sensitivity.
- The StartDrawingToday Calibration: Shift your curve to be “S-shaped” or “Firm.” This requires you to press slightly harder for a thick line, mimicking the physical compression of a 2B pencil or the flex of a G-pen nib.
- The Taper Test: Practice “flick” strokes. In other words, if your lines end in blunt stubs instead of elegant points, your software’s Brush Taper settings are likely fighting your natural lift-off. Adjusting these “internal physics” is the first step in building Structural Confidence.
2.3 Ergonomics and “Gorilla Arm”
Unfortunately, digital art invites a sedentary, hunched posture that traditional easels usually prevent. Hence, you must beware of “Gorilla Arm”. By definition, this is the fatigue caused by holding a stylus against a vertical screen for too long. It’s a real threat to your Neuroplasticity gains. While learning exercises to improve digital art proficiency, some fatigue is expected. However, if you’re in actual pain, it’s a sign you aren’t learning.
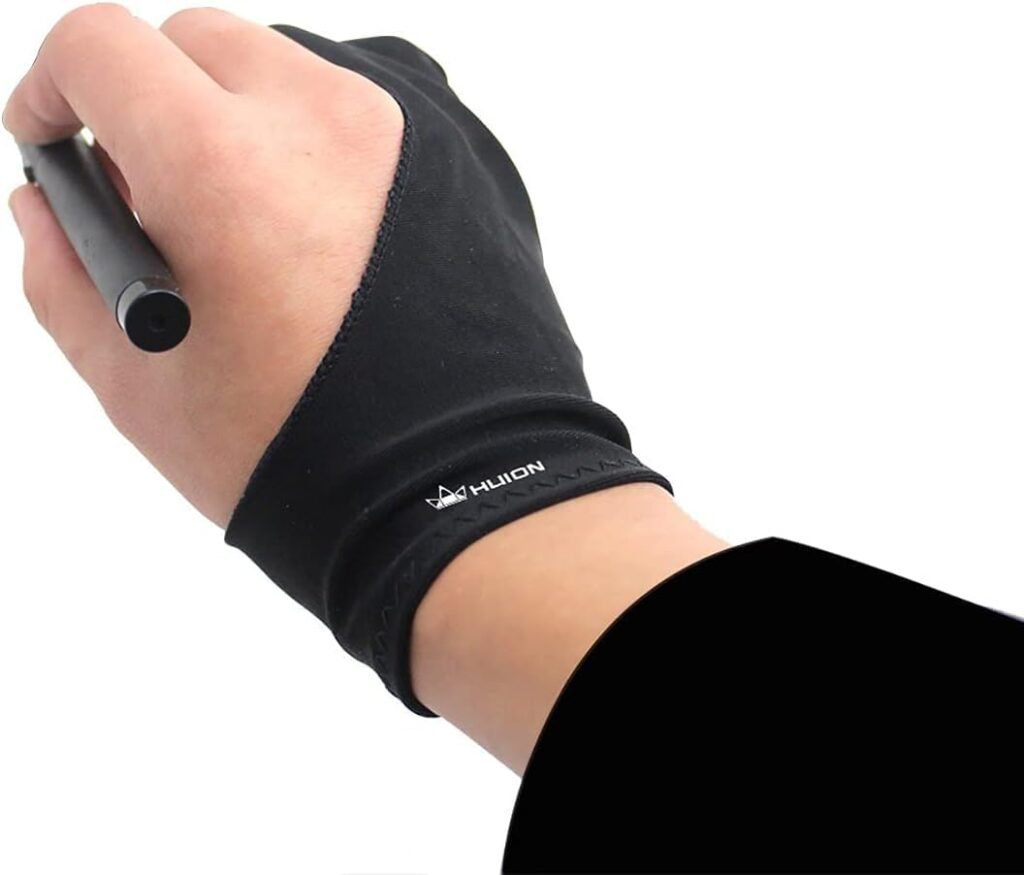
We suggest using an adjustable tablet stand to maintain a 30-degree to 45-degree angle. Additionally, wear a two-finger drawing glove. It’s not just for aesthetics; it allows your hand to glide across the glass without oils causing “stutters,”. Furthermore, it ensures the palm-rejection technology in your device doesn’t mistake your hand for a stray brush stroke.
3. Structural Logic: The “Loomis Anchor” Exercises
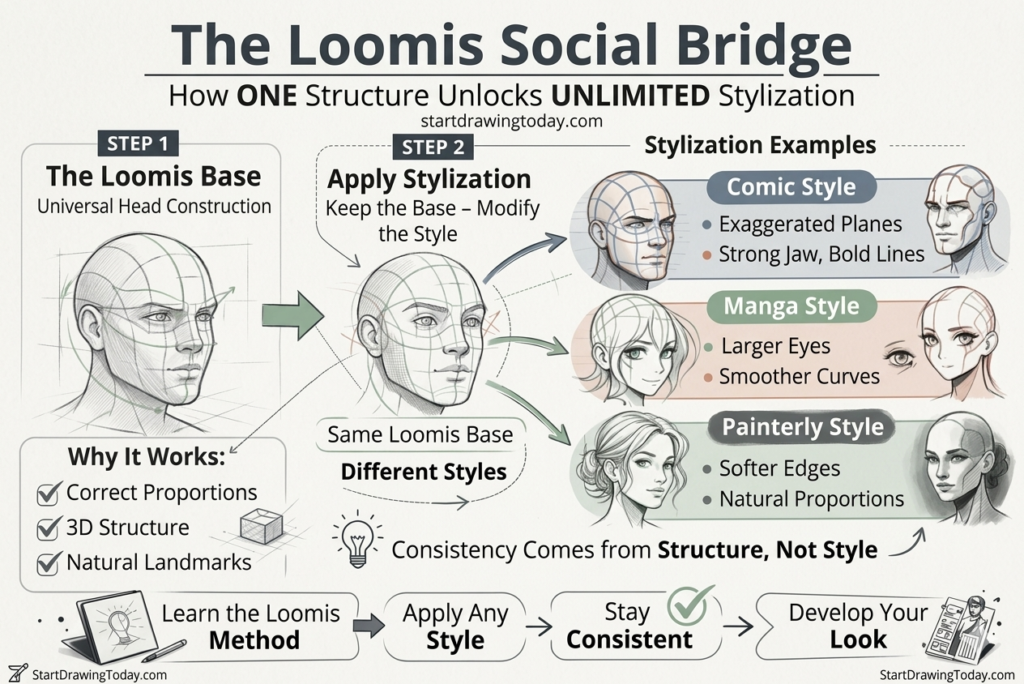
Thirdly, if the “Undo” button is a safety net that has become a trap, then Structural Logic is the floor that makes the net unnecessary. For adult learners, the most effective way to build this floor is through the Loomis Method. Developed by illustrator Andrew Loomis, this technique isn’t just an anatomy lesson; it is a mental framework. A framework that converts the overwhelming complexity of a human face into a series of predictable, manageable “logical anchors.”
3.1 Bypassing Perfectionism with the “Cranial Ball”
Truthfully, perfectionism thrives on guesswork. When you start a digital sketch by trying to draw a “perfect” eye, you are gambling on placement. The Loomis Method removes the gamble by starting with a simple sphere—the Cranial Ball.
By “slicing” off the sides of this sphere to create a Side Plane As a result, you establish the 3D orientation of the head before a single feature is drawn. This is where your Crystallized Intelligence—your life experience and pattern recognition—becomes an asset. For example, instead of worrying if the sketch “looks like a person” yet, you focus on the geometry. Therefore, if the sphere and its side plane are correct, the rest is mathematically bound to follow.
3.2 The Facial Grid: Your Proportional GPS
Once your cranial ball is set, you apply the Facial Grid. This is a high-contrast blueprint of lines that act as a “GPS” for your features.
- The Brow Line: Wrapped around the center of the sphere, this is your primary horizontal anchor.
- The Rule of Thirds: Dividing the space from the hairline to the chin into three equal parts (Hairline to Brow, Brow to Nose, Nose to Chin).
- The Mid-Line: A vertical line that ensures the symmetry of the features, regardless of the angle.
In drawing apps, use a separate layer for this grid. This allows you to build Structural Confidence by knowing exactly where the “Nose Line” or “Chin Line” should be. When you finally move to the refinement stage, you aren’t guessing; you’re just tracing the logic you’ve already built.
3.3 The 60-Second “Logic Sprint” For Exercises To Improve Digital Art Proficiency
To truly internalize these Fine Motor Skills, we recommend the Logic Sprint. Set a timer for 60 seconds and draw only the Loomis construction (sphere, side plane, and grid). Do not draw eyes. Do not draw hair. Timed workflows is one of the most effective ways to practice exercises to improve digital art proficiency.
The goal isn’t a “pretty” picture; it’s the repetition of the logic. By doing ten of these sprints, you are training your brain to see the head as a 3D object rather than a flat 2D shape. This rapid-fire practice bypasses the Perfectionist Doom Loop. Reason being, there isn’t enough time to worry about mistakes. Instead, you are simply building the “Loomis Anchor” until it becomes a reflex.
4. The “Undo” Detox: Building Line Confidence
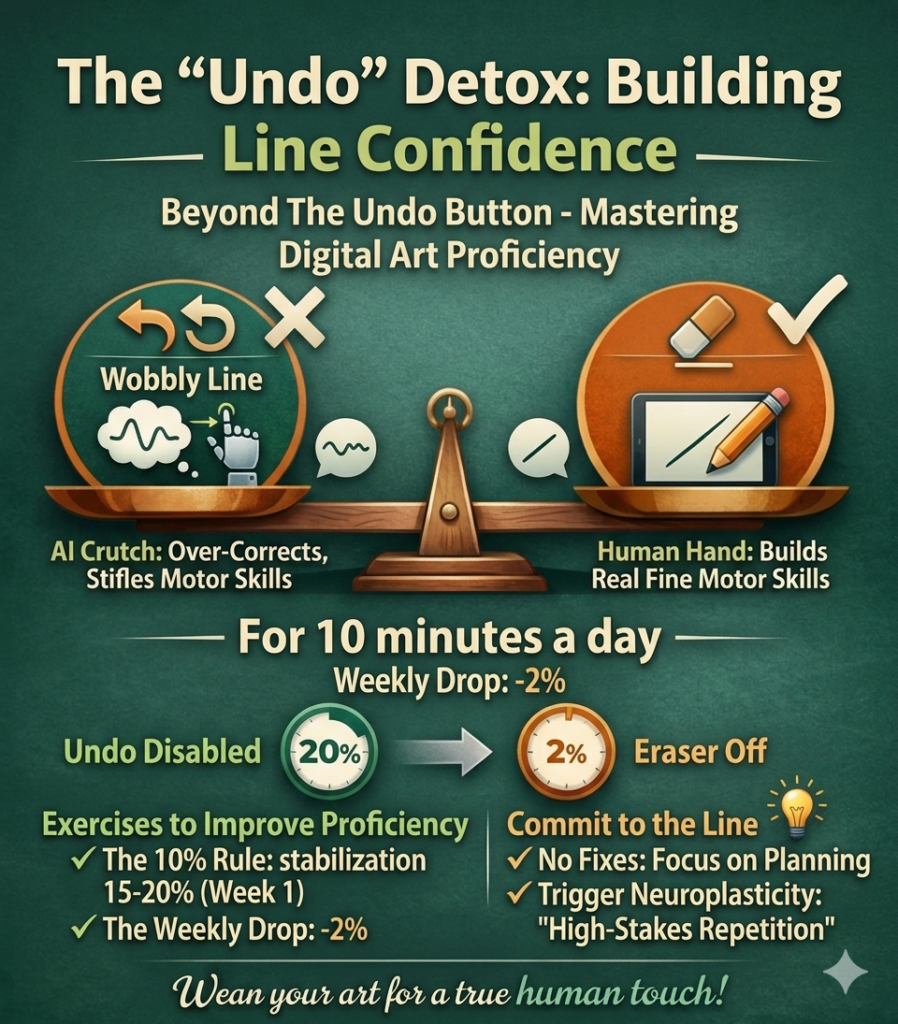
Fourth, if you’ve ever found yourself performing the “two-finger tap” more often than actually drawing, you aren’t alone. You’re just caught in the Undo Loop. Traditionally, a mark made with drawing pencils or a ballpoint pen is a commitment. In drawing apps, every mark is a suggestion. Hence, this safety net is exactly what prevents the development of true Line Confidence.
4.1 Breaking the Two-Finger Tap Habit by Using Exercises To Improve Digital Art Proficiency
The psychological trap of the digital canvas is that it rewards perfectionism over progress. When you can instantly erase a wobbly line, your brain never learns how to correct the physical motion of your hand. You become a “sketch-refiner” rather than a “mark-maker.”
To break this, we suggest a radical “Undo” Detox as one of the exercises to improve digital art proficiency. For 10 minutes of your daily practice, disable the undo gesture and the eraser tool entirely. This forces you to live with every stroke, moving your focus from “fixing” to “planning.” By committing to the line before the nib touches the glass, you trigger Neuroplasticity. By definition, Neuroplasticity is “the brain’s ability to rewire itself through high-stakes repetition”.
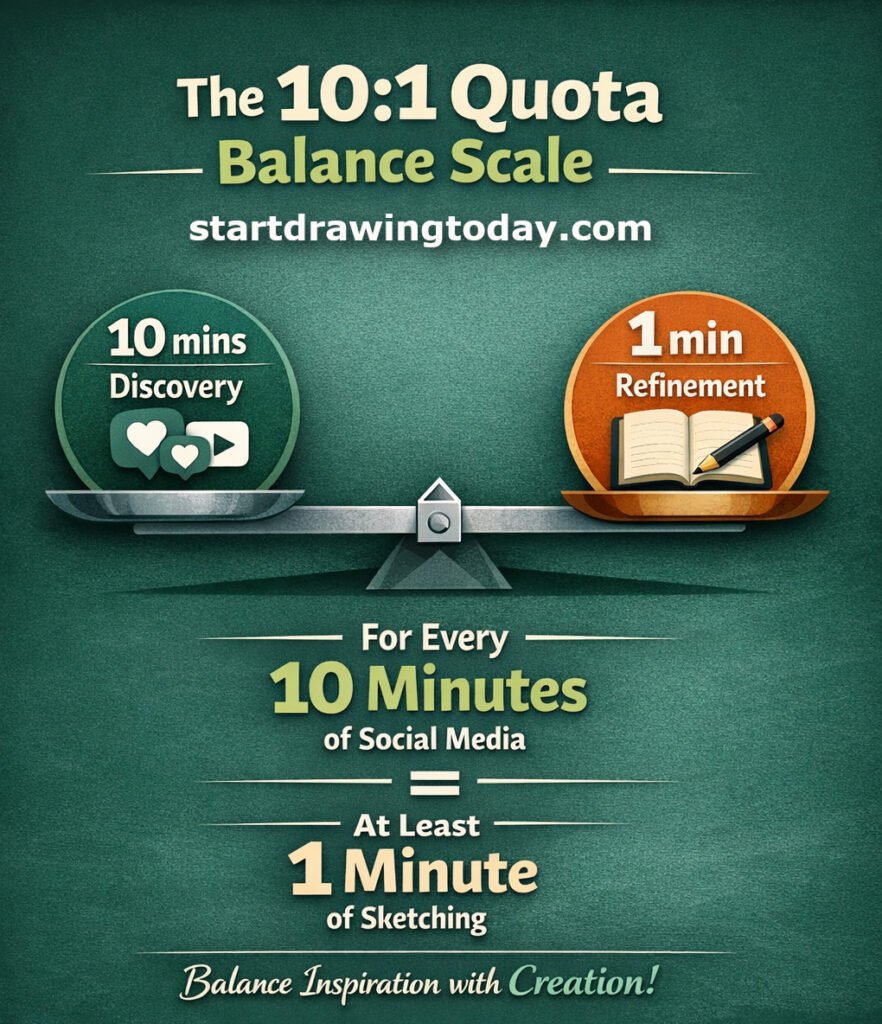
4.2 The 10:1 Quota for Digital Wellness
As an adult learner, your biggest enemy isn’t a lack of talent; it’s Comparison Paralysis. You likely spend hours scrolling through professional galleries on social media. Unfortunately, this scroll likely feeds your Crystallized Intelligence (your taste) while your Fine Motor Skills (your hands) sit idle. This creates the Taste-Skill Gap that leads to immediate frustration when you finally pick up the stylus.
Our proprietary 10:1 Quota is the mechanical solution to this imbalance:
- 10 Minutes of Discovery: Use this time for passive observation, gathering inspiration, or “scouting” techniques.
- 1 Minute of Refinement: For every 10 minutes you spend looking at art, you must spend at least 1 minute in active, deliberate practice—like a Loomis Method drill or a line-tapering exercise.
By sticking to this ratio, you ensure that your “input” never completely overwhelms your “output.” It keeps the Zone of Perfectionist Frustration manageable as you perform exercises to improve digital art proficiency. Most importantly, it ensures you are consistently building technical proficiency. Eventually, this technical proficiency will match your high aesthetic standards.
4.3 High-Stakes Ghosting: One Of The Best Exercises To Improve Digital Art Proficiency
To maximize the effectiveness of your “Detox,” combine it with the Ghosting Drill mentioned in Section 2. Before you drop a line that you aren’t allowed to erase, “ghost” the motion three times in the air. This mental rehearsal bridges the gap between your intent and your execution. When the stylus finally hits the screen, the line isn’t a guess—it’s a calculated decision. This is how you move from “fiddling” with software to mastering the medium.
5. Software Mastery: Settings as Tools, Not Crutches
Fifth, in the world of digital art proficiency, software is a double-edged sword. Modern drawing apps like Procreate and Photoshop offer “quality of life” features. Which in turn, can either accelerate your learning or act as a permanent crutch. To master the medium, you must understand the “math” behind your brush. Additionally, you must know when to take manual control over the machine.
5.1 Eliminating The Stabilization Trap With Exercises To Improve Digital Art Proficiency
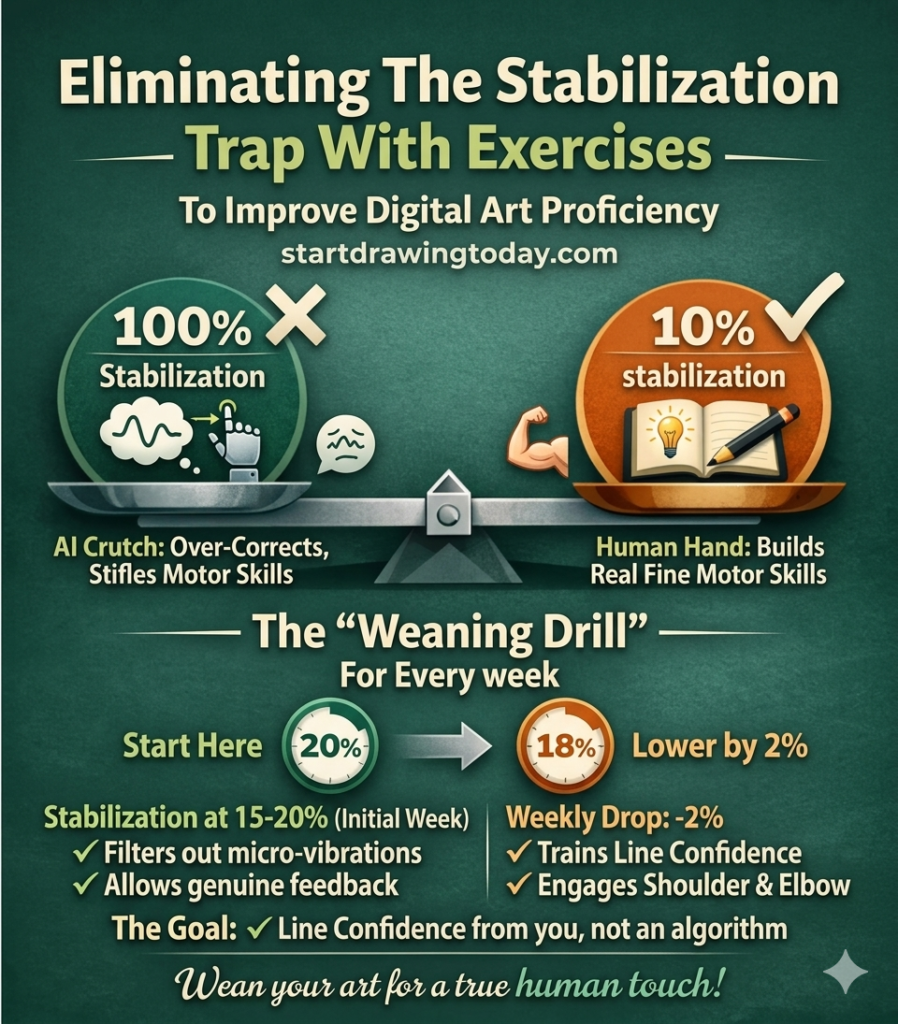
Consequently, most beginners crank their Stabilization or “Smoothing” settings to 100% to combat the “wobbly line” syndrome on glass. While this produces a clean stroke, it’s a form of artificial intelligence. These digital settings are the equivalent of “guessing” your intent rather than reflecting your skill. Rather than cheating digitally, employ exercises to improve digital art proficiency.
In reality, if the software is doing all the work, you aren’t building Fine Motor Skills. We recommend a “Weaning Drill”:
- The 10% Rule: Start with your stabilization at 15–20%—just enough to filter out the micro-vibrations of the stylus.
- The Weekly Drop: Every week, lower the setting by 2%.
The goal is to reach a point where your Line Confidence comes from your shoulder and elbow, not an algorithm. This ensures that your work retains a “human” quality that purely software-driven art often lacks.
5.2 Value Before Color: The Blending Mode Logic
One of the biggest hurdles for the adult learner is the infinite color wheel. For instance, it’s easy to get lost in “hues” when the real problem is “value” (how light or dark a shape is). This is where Blending Modes become a functional tool for Structural Logic.
Instead of picking colors by eye, try this workflow:
- Value Blocking: Paint your sketch in grayscale using only three values: a light, a mid-tone, and a dark.
- The “Multiply” Anchor: Place your color on a layer set to “Multiply” over the grayscale. This keeps your lighting consistent regardless of the color you choose.
- The “Overlay” Pop: Use “Overlay” or “Add” modes sparingly to simulate highlights or light glow.
By using these digital “math” layers, you separate the challenge of Form from the challenge of Color. Separating Form and Color allows your brain to focus on one proficiency at a time.
5.3 Limiting the Palette to Reduce Decision Fatigue
The “Paradox of Choice” is a major trigger for Perfectionism. To build proficiency, you must create constraints. Before starting a piece, pick a “limited palette” of only 4–5 colors.
In apps like Clip Studio Paint, you can lock these into a custom palette. By removing the need to constantly hunt for the “perfect” blue, you free up cognitive resources. In turn, you can focus on your Loomis Anchor and proportional accuracy. Remember: mastery comes from depth of practice, not the breadth of your brush library.

6. Conclusion: Reclaiming the Joy of the Sketch
In conclusion, digital art is often marketed as a shortcut to perfection. However, for the adult learner, that “perfect” result is often the very thing that kills the fun. Reclaiming your joy in the medium requires a shift in perspective. With that said, stop viewing your tablet as a magic wand and start treating it as a high-precision instrument. An instrument that requires Structural Logic and intentional practice.
6.1 Logic Over Magic By Using Exercises To Improve Digital Art Proficiency
By applying the Loomis Method as your “Logical Anchor,” you’ve seen how to bypass the Perfectionist Doom Loop. When you lead with a Cranial Ball and a Facial Grid instead of a polished eye, you aren’t just drawing; you are building a foundation that can withstand the “slip” of the glass. This is the essence of Structural Confidence. It’s the realization that a “bad” drawing is usually just a breakdown in logic, not a lack of talent.
6.2 The Sustainable Creative Habit
The mechanical drills we’ve discussed—the Undo Detox, the Ghosting Drill, and the 10:1 Quota—are designed to bridge the Taste-Skill Gap. They recognize that your Crystallized Intelligence (your taste) will always be one step ahead of your Fine Motor Skills. Instead of fighting that gap, you are now managing it. You are feeding your inspiration while ensuring your hands stay busy with the deliberate practice needed to catch up.
6.3 Your Next Stroke Using Exercises To Improve Digital Art Proficiency
The journey to digital art proficiency doesn’t end with a “finished” masterpiece; it’s a continuous loop of discovery and refinement. As you move forward, remember to check your pressure sensitivity curves. Moreover, keep your stabilization low enough to feel the line. Most importantly, allow yourself to make “ugly” sketches.The goal at StartDrawingToday.com isn’t to help you make one perfect image; it’s to help you learn exercises to improve digital art proficiency. Gradually, you will feel the quiet, focused hum of Creative Flow.
Leave a Reply