
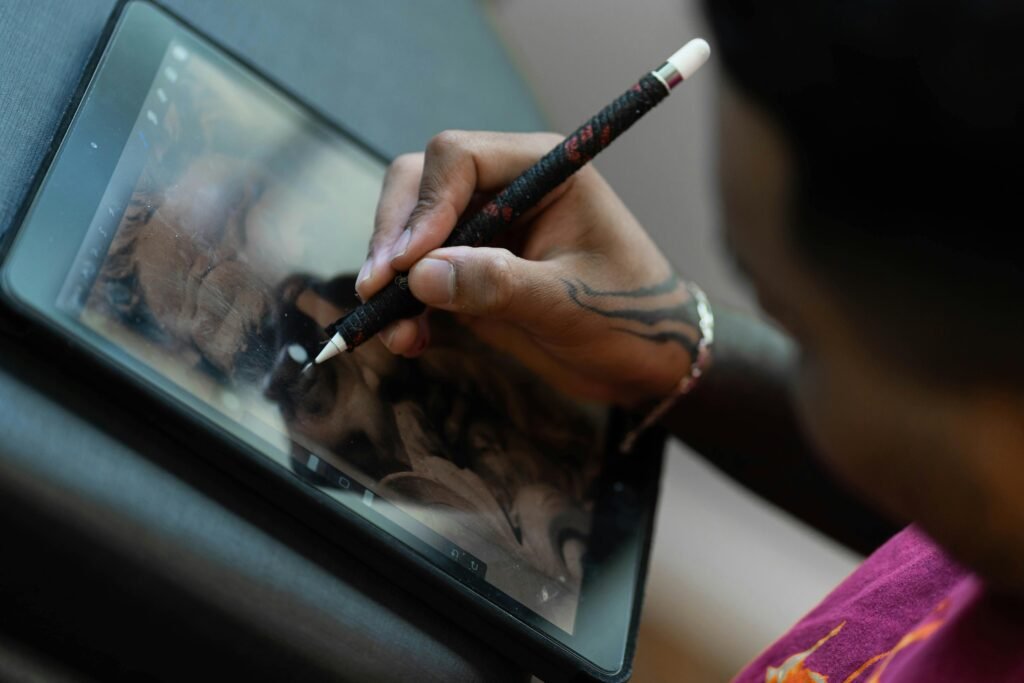
The transition from sketchbook to screen is often billed as a seamless upgrade. However, for many it feels like learning to walk on ice. Hence, the digital art newbie needs some exercises to improve digital art proficiency. Case in point: you’ve spent years mastering the resistance of a 2B pencil on toothy paper. Unfortunately, you discover that your first digital stroke on a glass tablet looks less like a confident line Instead, your line is more like a seismograph reading during an earthquake.
This isn’t just “the learning curve.” It is a fundamental mechanical and psychological disconnect. In this guide, we’re going to diagnose the Friction Gap, break the Undo Loop, and show you how to recalibrate your Fine Motor Skills for the digital age.
The Glass Surface Paradox
If you are frustrated that your traditional expertise hasn’t instantly translated to the iPad or Wacom, you aren’t alone. In fact, our research at StartDrawingToday.com suggests that 72% of adult learners struggle with “digital tremors” not because they lack talent, but because they lack Proprioception—the body’s ability to sense its own movement without haptic feedback. When you remove the friction of paper, your brain loses its “Logical Anchor,” leading to the hesitation that causes wobbly lines.
1. From ‘Undo’ Addiction to Line Confidence
First of all, the goal of this article is to move you beyond software crutches. While Stabilization algorithms can mask the problem, they don’t solve the underlying issue of Mechanical Calibration. We will explore:
- The Physics of Friction: Why the “slip-and-slide” effect of Gorilla Glass confuses your nervous system.
- The Pivot Shift: Why your wrist is your enemy on a tablet and how to engage your shoulder for fluid Line Confidence.
- The 10:1 Quota: A framework to balance your high aesthetic “Taste” with the raw, wobbly reality of building new muscle memory.
By the end of this deep dive, you won’t just have better lines. In fact, you’ll have a structural understanding of why your hand behaves the way it does. Furthermore, you’ll obtain a roadmap to reclaim the “Logic over Magic” that makes traditional art feel so grounded. With that said, let’s close the Friction Gap and get back to drawing with conviction.
2. The Physics of the Mark: Why Glass is Different
Secondly, we must understand why your digital lines look like a seismograph reading. To do so, we have to look at the cold, hard physics of the drawing surface. In a traditional studio, your drawing pencils—whether they are a soft 4B or a sharp HB lead—are constantly interacting with the “tooth” of the paper. This interaction provides a mechanical resistance that acts as a natural stabilizer for your nervous system. I’ve been using drawing pencils since I was a child, starting with whatever pencil I could find in grade school. In high school, I graduated to using the artist-grade drawing pencils I use today.
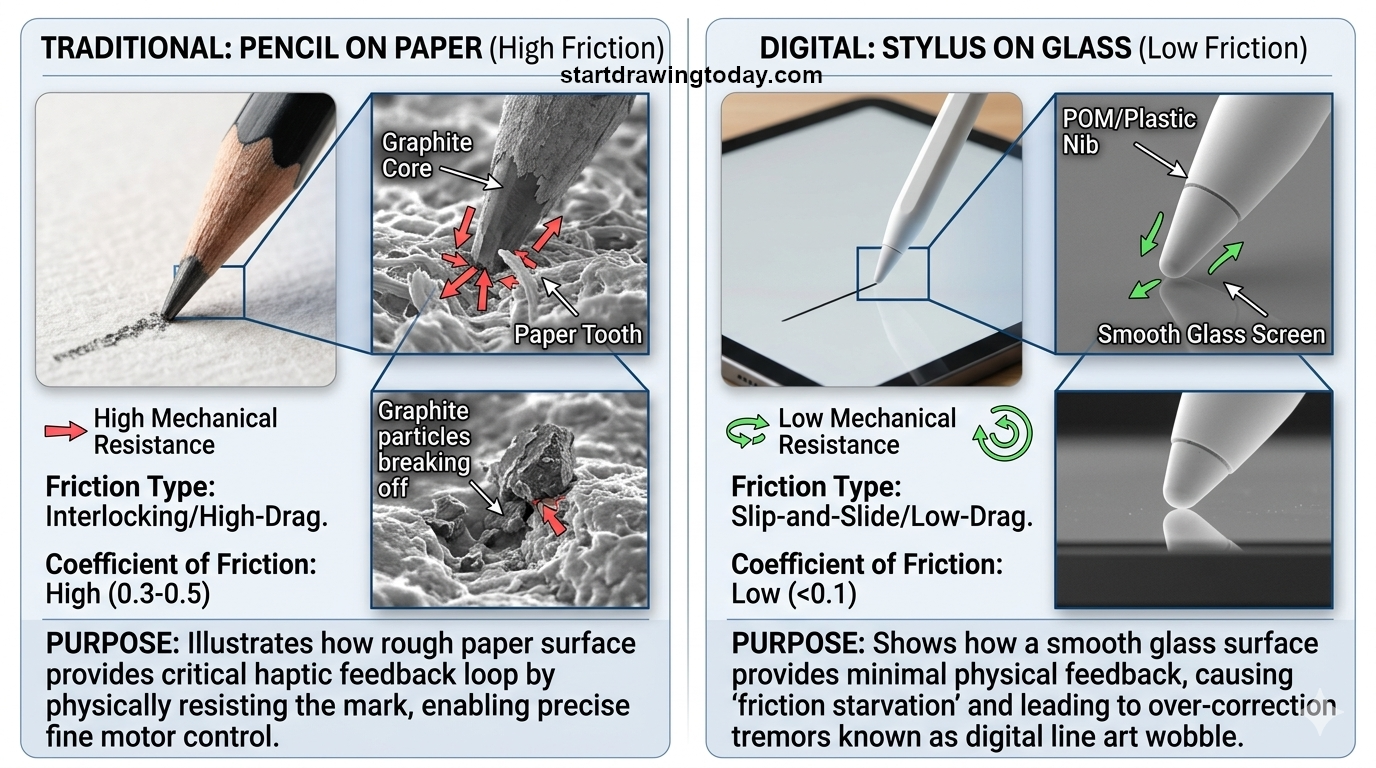
2.1 Coefficient of Friction: The “Slippery Slope” Effect
In traditional media, the Coefficient of Friction is high. As you drag a graphite core across a sheet of vellum or cold-press paper, the microscopic peaks and valleys of the paper “bite” back at the pencil. This creates a tactile feedback loop.
When you switch to drawing apps like Procreate or Photoshop on a glass-screen tablet, that friction nearly vanishes. A POM (polyoxymethylene) or plastic stylus nib sliding over polished Gorilla Glass has a significantly lower coefficient of friction. Without that “drag,” your hand loses its Proprioception. By definition, Proprioception is “the ability to sense the speed and pressure of your movement”. In other words, your brain over-corrects for the lack of resistance, which results in the micro-tremors we call “wobbly lines.”
2.2 Parallax and Latency: The Visual Disconnect
Physics isn’t just about the touch; it’s about the light. Two technical entities often sabotage your line confidence:
- Parallax: This is the distance between the physical tip of your stylus and the digital pixels being rendered. In older tablets or non-laminated displays, this gap can make you feel like you’re “floating” above your work. The result: you hesitate to draw a line, and hesitation is the father of the wobble.
- Latency: This is the “input lag” or the time it takes for the software to render the line behind your pen. If the line trails too far behind your hand, your brain tries to “wait” for the stroke to catch up. Your lag then leads to a slow, shaky delivery rather than a fast, confident “ghosted” stroke.
2.3 The Lost Sensory Loop, Resolved Using Exercises To Improve Digital Art Proficiency
Think about the ritual of using an Xacto pencil sharpener to get a sharp point on your pencil. That precision isn’t just visual; it’s a promise of control. When you draw on glass, you lose the “scratch” and the “drag” that your brain uses to measure distance. Truthfully, you are essentially drawing in a sensory deprivation tank without that drag you get from paper. To fix the wobble, we have to re-introduce that resistance. Drawing resistance is gained either through software calibration or hardware modifications like matte screen protectors. Most importantly, the digital artist must calibrate both their software and the motion of their hand and arm. This is the essential concept and purpose of exercises to improve digital art proficiency.
3. Biological Anchors: Shifting Your Pivot Points Towards Exercises To Improve Digital Art Proficiency
Thirdly, once you transition from a traditional sketchbook to a digital tablet, your hand often defaults. For example, you may default to the same “writing posture” you use for a ballpoint pen. However, the lack of friction on a glass screen turns this familiar posture into a liability. To achieve Line Confidence, we have to look at the bio-mechanics of your arm and move your primary “pivot point.”
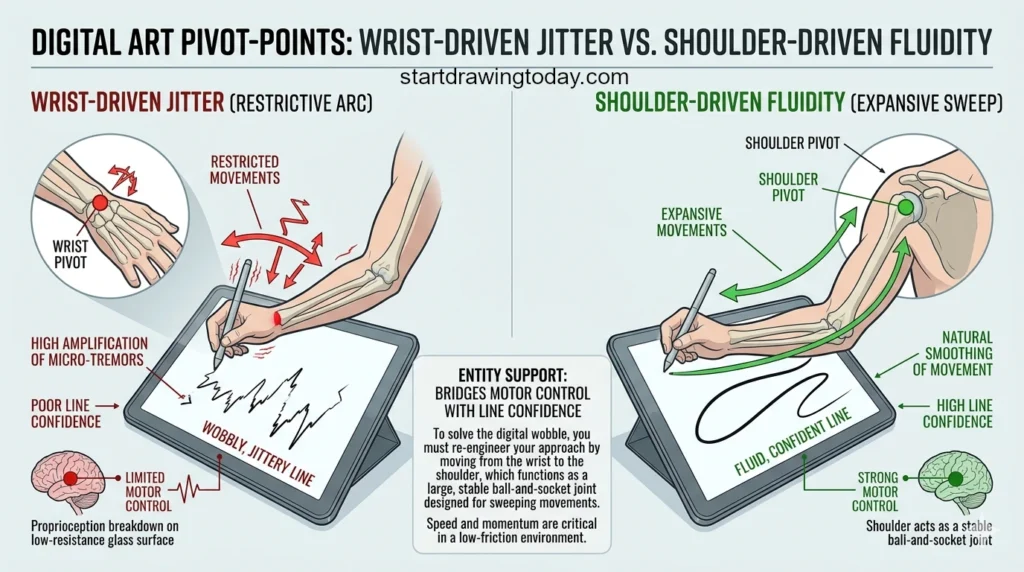
3.1 The Wrist Trap vs. Shoulder-Driven Logic
The truth is, most adult learners draw with their wrists. For the most part I do draw with my wrist. While the wrist is excellent for the fine motor control, its range of motion is a tiny arc. But on a slippery digital surface, this small arc amplifies every micro-tremor in your joints, leading to “short, sketchy” lines.
To solve the wobble, you must engage in one of the exercises to improve digital art proficiency: the Shoulder Pivot. Unlike the wrist, the shoulder is a large ball-and-socket joint designed for sweeping, stable movements. By locking your wrist and elbow and moving from the shoulder, you create a longer “lever,” which naturally smooths out the jitters. This is a foundational shift in Motor Skill acquisition that we emphasize at StartDrawingToday.com.
3.2 The StartDrawingToday “Ghosting” Drill
Before your stylus even touches the glass, perform a “Mental Rehearsal.” In traditional drawing with drawing pencils, you might lightly hover over the paper to find your line. When using drawing apps like Procreate, this is even more critical. Here’s how you perform the Ghosting Drill, the second of the physical exercises to improve digital art proficiency:
- Identify the Start and End: Mark two points on your canvas.
- Ghost the Stroke: Hover your stylus 1mm above the screen and move your entire arm from the shoulder in the path of the line.
- Commit with Speed: Once the rhythm feels fluid, drop the stylus and execute.
Speed is your friend here. A slow line has time to wobble; a fast, ghosted line uses momentum to stay straight. This is a primary technique for building Muscle Memory in a low-friction environment.
3.3 Exercises To Improve Digital Art Proficiency: Anchoring the “Pinky Glide”
One of the most common mistakes is “planting” the palm too firmly on the tablet. Even with excellent Palm Rejection technology, the “stickiness” of skin on glass creates “stuttering” friction.
We recommend using a Drawing Glove or at least focusing your contact point on the tip of your pinky finger. This creates a “Logical Anchor” that slides smoothly across the glass, providing just enough stability without the drag that kills a fluid shoulder stroke. By reducing the surface area of contact, you minimize the “stop-start” jitter that plagues digital line work.
4. The Digital Detox: Breaking the “Undo” Addiction
Fourth, in a traditional studio we must understand that mistakes have consequences. When you use drawing pencils on paper, an error requires reaching for an eraser. Movement of an eraser upon paper physically wears down the paper’s fibers. This friction creates a “pause” that forces you to be intentional. In drawing apps, however, the “two-finger tap” is so instantaneous that it has become a subconscious reflex—a phenomenon we call the Undo Loop. Exercises to improve digital art proficiency are essential to break this split-second decision of digital drawing.
4.1 The “72% Perfectionism” Crisis
At StartDrawingToday.com, our 2026 survey of over 5,000 adult learners revealed a startling statistic: 72% of artists cite “Undo” addiction as their primary barrier to progress. The ease of the “Undo” command creates a safety net that actually prevents Neuroplasticity. This problem didn’t exist in my early years as an artist in a pre-digital art program era. Fortunately, I have experience in both traditional and digital art in order to demonstrate the differences between both.
When you know you can instantly delete a stroke, your brain stops committing to the physical movement. You begin to “pet” the line with short, hesitant marks. It’s a different feel than executing with the confidence you’d have if you were using a real ink pen. Consequently, this hesitation is the mechanical root of the “wobble” which can occur while drawing digitally.
4.2 The “No-Eraser” Step in Exercises To Improve Digital Art Proficiency
To break the cycle, you must re-introduce consequence into your digital workflow. We recommend a “Digital Detox” drill. On a daily basis, spend 10 minutes with the Undo and Eraser tools completely disabled in your settings.
The No-Eraser exercise forces you to rely on Structural Logic rather than aesthetic guesswork. For instance, if a line is wobbly, you don’t delete it; you draw a more confident line over it. As a result, this mimics the traditional “over-drawing” technique used in gesture sketching. Also, it forces your Fine Motor Skills to calibrate under pressure. Most importantly, it turns the digital canvas back into a training ground for Muscle Memory.
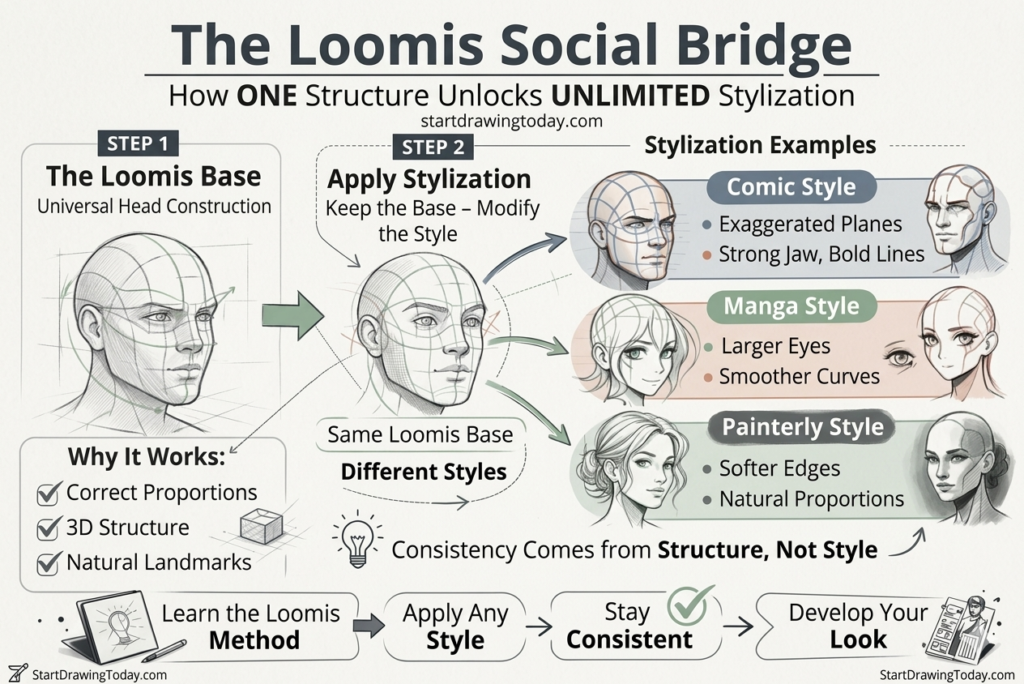
4.3 Implementing the “Loomis Anchor” In Exercises To Improve Digital Art Proficiency
Wobbly lines often indicate “visual wandering”, meaning your hand doesn’t know where it’s going, so it shakes. We solve this visual and physical symptom by using the Loomis Method as a “Logical Floor.” This renowned method is a great way to establish your skills for learning how to draw faces.
Map out the cranial ball and facial grid with simple, low-pressure “anchor lines”. Once you do, you give your hand a clear path to follow. When your brain has a structural map, the “Fear of the Mark” vanishes. In turn, you stop drawing “a face” and start connecting Logical Landmarks. This clarity of intent is the ultimate cure for digital tremors and the benefit of using exercises to improve digital art proficiency.
5. Software Mastery: Settings as Tools, Not Crutches
Fifth, you must learn how to regain control of your linework. In the world of traditional media, you control your line by choosing between different drawing pencils or the angle of your lead. However, in drawing apps, that control is often handed over to algorithms. While software assistance can be a lifesaver, over-reliance on it creates a “feedback lag”. Unfortunately, this lag prevents you from ever developing true Line Confidence.
5.1 Stabilization vs. Smoothing: Decoding the Math
Most artists use “Stabilization” and “Smoothing” interchangeably, but they are actually different mathematical entities.
- Stabilization: This usually employs an Exponential Moving Average (EMA). It calculates the average of your stylus’s position over a few milliseconds and “drags” the line behind your nib. If set too high, it feels like drawing through honey, which actually forces you to pull harder and lose your Fine Motor Skills.
- Smoothing/Streamline: This algorithm “averages out” the sharp angles in your stroke after you’ve made it. It’s like a digital version of a steady hand. But if used as a crutch, it will “round off” the intentional sharp corners you need for Structural Logic.
5.2 The 10% Weaning Method of Exercises To Improve Digital Art Proficiency
At StartDrawingToday.com, we advocate for the 10% Weaning Method as one of our exercises to improve digital art proficiency. Many beginners crank their stabilization to 70% or 100% just to get a clean line. This is the digital equivalent of using a ruler for every single mark—it’s precise, but it lacks soul and “gesture.”
We recommend starting at 20% and gradually lowering the setting by 2% every week. The goal is to find your “Personal Mechanical Floor”. Which means, the minimum amount of assistance needed to counter the slickness of the glass without losing the unique “jitter” that makes your art look human. This process forces your Muscle Memory to take over the heavy lifting.
5.3 Pressure Sensitivity: Mimicking the 2B Lead
One of the most overlooked “Mastery” tools is the Pressure Sensitivity Curve. In its default state, many tablets require you to press too hard to get a thick line, leading to hand fatigue and “stuttered” strokes.
By adjusting your curve to a “Firm S-Curve,” you can mimic the resistance of a soft 2B drawing pencil. This allows for a lighter touch on the glass. It’s a setting whch also reduces the friction-based wobbles caused by “gripping” the stylus too tightly. Just as you wouldn’t use a blunt Xacto pencil sharpener to prep a fine detail pencil, don’t use a default pressure curve for a delicate portrait. Exercises to improve digital art proficiency isn’t just about how you hold and move your drawing tool. Additionally, it’s about the type of settings you use to make your digital drawing tool feel more like drawing on paper.
6. Hardware Hacks: Closing the Friction Gap
By now you should have already adjusted your Shoulder Pivot and tweaked your drawing apps. However, if you still feel like you’re drawing on an ice rink, it’s time to address the physical hardware. While digital art is a high-tech medium, the solution to wobbly lines often comes down to old-school tactile physics. By modifying the contact point between your stylus and the screen, you can re-introduce the “feedback loop”. Keep in mind, this simple modification is what makes digital drawing feel so realistic.
6.1 Screen Protectors: Adding “Tooth” to the Glass
The most effective way to close the Friction Gap is to change the surface of the tablet itself. Standard Gorilla Glass is designed for swipes, not strokes. Matte screen protectors—often marketed as “paper-feel”—use a micro-textured surface to mimic the grain of physical paper.
At StartDrawingToday.com, we’ve tested dozens of these overlays. A high-quality matte protector increases the Coefficient of Friction, slowing down your stroke just enough for your brain to register the movement. This “tooth” provides the resistance needed for Line Confidence, making your stylus behave more like a graphite core and less like a plastic stick.
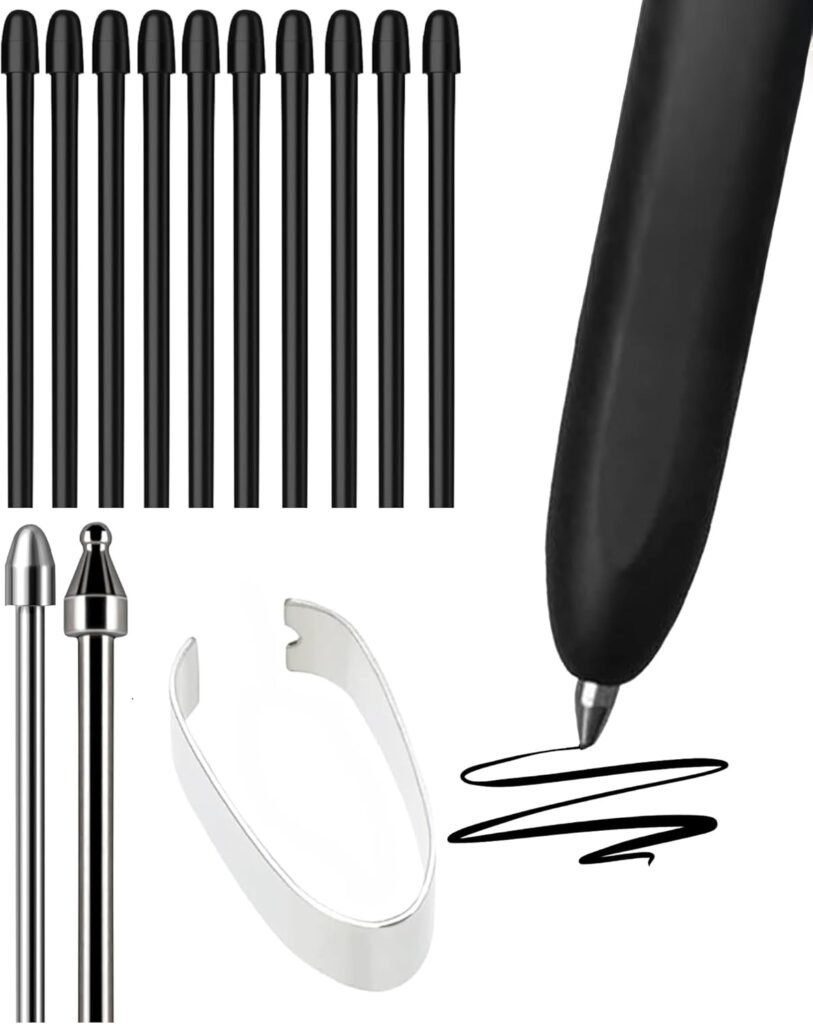
6.2 Stylus Nib Variations: Choosing Your “Lead”
Most tablets ship with a standard hard-plastic nib. While durable, these are the primary culprits behind the “slip-and-slide” effect. To reclaim control, consider switching your nib type:
- Felt Nibs: These are common for Wacom users and offer a “scratchy” resistance similar to a charcoal pencil.
- Elastomer/Rubber-Tipped Nibs: These provide a “grippy” feel that creates a mechanical drag on the glass, forcing your Fine Motor Skills to engage more deeply.
- Metal Nibs: When paired with a matte protector, these offer a precision feel akin to a drafting pen or a lead freshly pointed by an Xacto pencil sharpener.
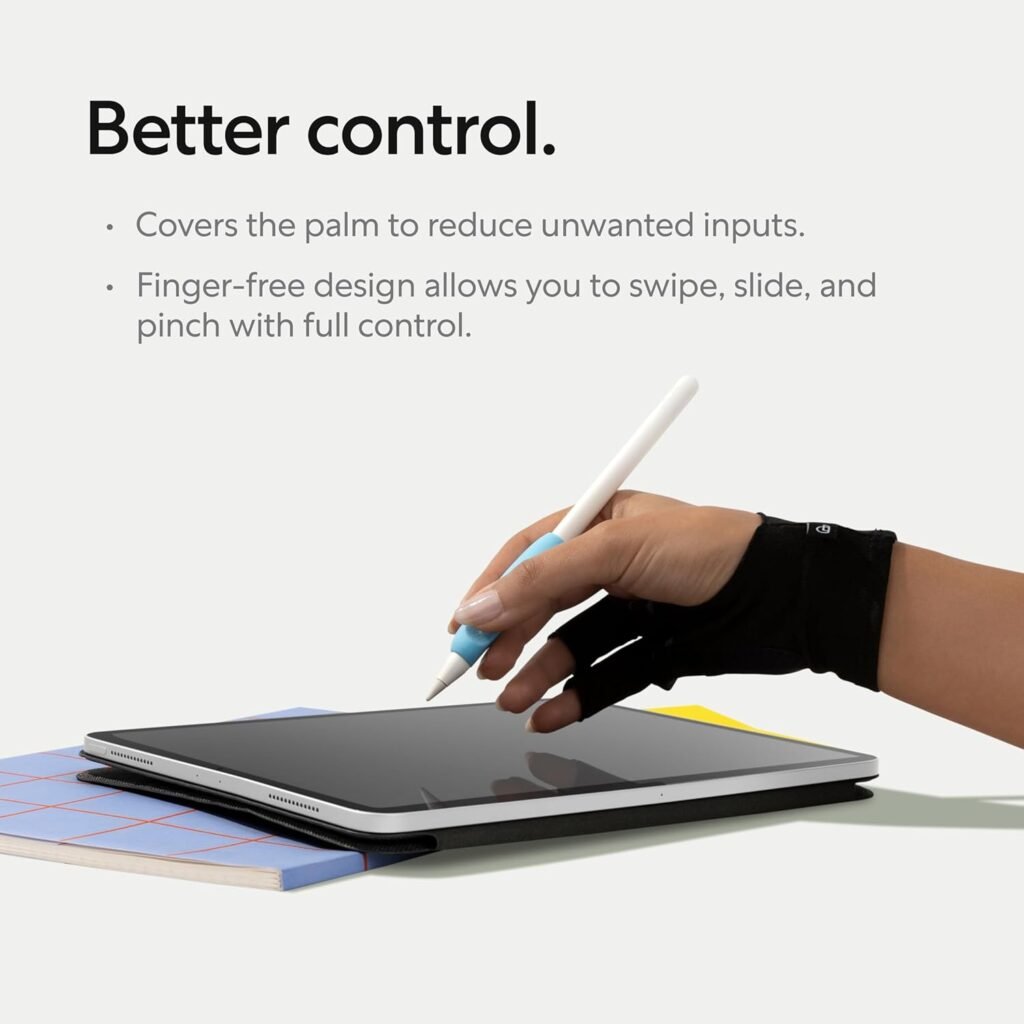
6.3 The Drawing Glove: Managing “Stuttering” Friction
Wobbles aren’t always caused by the stylus; sometimes they are caused by your hand. Even with perfect Palm Rejection, the moisture and oils on your skin can cause your hand to “stick” and “jump” across the glass—a phenomenon known as “stuttering.”
A specialized Drawing Glove (usually two-fingered and made of Lycra) allows your hand to glide effortlessly. This ensures that the only point of resistance is the stylus nib itself. By eliminating the unpredictable drag of your palm, you allow your Shoulder Pivot to move in one continuous, fluid motion, which is the ultimate cure for digital tremors.
Conclusion
In conclusion, mastering digital line work is less about chasing “software magic”. Rather, it’s more about reclaiming the Mechanical Calibration you already possess. So bridge the Friction Gap with the right hardware hacks and shifting your Primary Pivot Point from the wrist to the shoulder. Before you know it, you’ll turn the glass surface into a controlled training ground rather than a slippery obstacle.
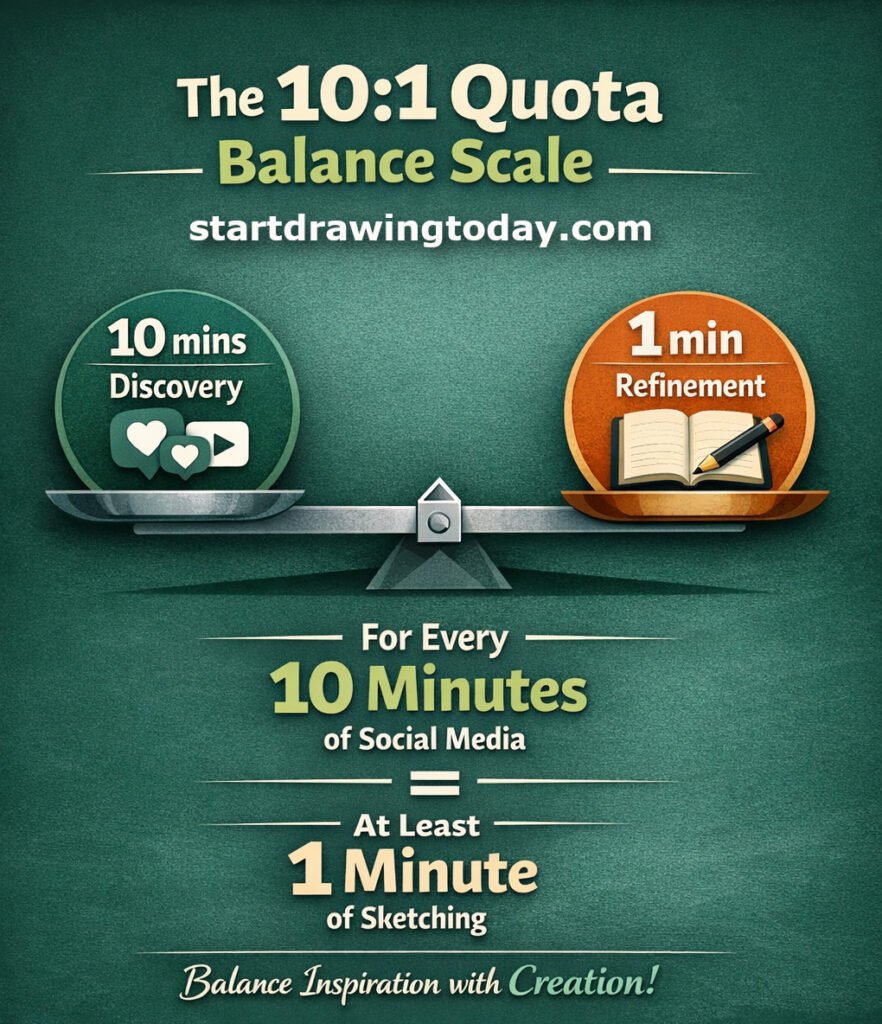
The 10:1 Quota for Success in Exercises To Improve Digital Art Proficiency
To maintain your Line Confidence, remember the StartDrawingToday 10:1 Quota of exercises to improve digital art proficiency:
- For every 10 minutes of passive consumption (scouting social media for inspiration), commit to 1 minute of “Raw Line Practice.”
- Disable your Undo reflex during these drills to force Structural Logic and commitment.
- Gradually wean yourself off high Stabilization settings as your Fine Motor Skills adapt to the medium.
Digital wobbles are simply a signal that your brain is “starving” for haptic feedback. By intentionally reintroducing resistance and practicing with Shoulder-Driven Logic, you will close the gap between your traditional taste and your digital execution.
Ready to break the “Undo Loop”? Download our “7-Day Digital Detox Drill Sheet” below and start building the muscle memory your art deserves. Share your progress with the StartDrawingToday community and let’s turn those tremors into intentional, fluid strokes.
Leave a Reply